It is difficult to imagine your life without household appliances. There are devices that we could do without, and there are those without which the arrangement of living space is justifiably considered inferior. One such vital item is a refrigerator. Do you agree?
DIY repair of home appliances is a good help for the family budget. If desired, you can master many repair operations. For example, replacing a thermostat for a refrigerator is not so difficult. One has only to understand the design features and principles of the device.
We will talk about how to detect a malfunction of the thermostat. The article we proposed describes in detail how to replace it during the repair of a Stinol brand refrigerator. Information is accompanied by a thematic selection of photo and video materials with expert advice.
Design features and operating principle
A temperature regulator or thermostat is one of the main elements without which the normal operation of the refrigerator is impossible. It records the temperature sensors in the refrigerator and freezer and sends a signal to the compressor start relay.
In accordance with these signals, the compressor turns on if the chamber is not cold enough, and turns off when the temperature reaches a predetermined level. Technically, a thermostat is a relay, at one end of which there is a sealed tube filled with freon.
On the other hand, contacts are installed, the opening and connection of which sends a signal to the compressor. The end of the freon tube, also called the capillary tube, is fixed to the evaporator.
The refrigerant placed inside reacts sensitively to heating and cooling. When the temperature decreases or rises, the pressure level inside the tube changes, as a result of which the relay contacts are connected or opened.
The movement of the contacts is controlled by a small spring. It is used to set the temperature level that should be inside the refrigerator. A temperature adjustment knob is attached to the spring. Turning this knob changes the degree of spring tension.
As a result, more or less force is required to close and open the contacts. This affects the pressure level in the capillary tube at which the contacts are triggered.

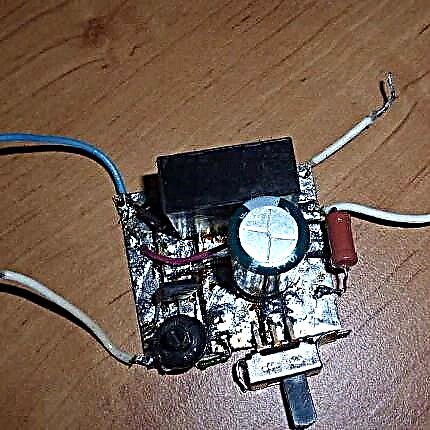
A temperature controller is a small device that is equipped with a sealed tube with a sensor filled with refrigerant. Based on changes in the evaporator temperature, the relay switches the compressor on or off
This regulates the degree of air cooling in the refrigerator. When using an electronic controller, this process is carried out in a slightly different way, but the principle remains approximately the same: the desired temperature level is set based on the actual indicators that the capillary tube fixes.
But such models use an electronic control module that can simultaneously manage data from several sensors. It is not always possible to repair or replace such a thermostat at home. To handle complex electronics, you need knowledge and special equipment.
Typically, a thermostat is installed inside or outside the refrigerator. Before starting repairs, it will not hurt to study the device of the refrigerator and the data sheet of the device. There can be a lot of useful information on the design of a specific model of a temperature regulator, as well as on its location.
Usually a thermal relay is located next to the knob for setting the temperature mode. The internal arrangement is typical for relatively old models. Inside the chamber, the element is usually enclosed in a plastic protective case.
The adjustment knob is located directly on it. To remove the thermal relay, you need to remove this knob and unscrew the fixing screws to remove the case.

For more modern models, thermal relays are placed outside the camera to save precious cubic centimeters of internal space and not to spoil the design with additional elements
But you need to look for the thermostat also near the control knob, usually under the refrigerator case somewhere above. The handle is removed in the same way, the fasteners are unscrewed and the desired one is found behind the protective panel.
Ways to Detect a Problem
If the thermal relay is broken, this does not mean that the entire refrigeration unit will immediately stop working. But the lack of correct information about the current temperature will affect his work.
Option # 1 - check the functioning of the equipment
Symptoms of improper operation of refrigeration equipment can be as follows:
- the compressor works without interruptions or with very short and rare interruptions;
- the temperature inside the refrigerator’s chamber drops to zero, and sometimes even lower;
- a large amount of hoarfrost or even ice appears on the walls;
- the inside of the refrigerator is too warm;
- the refrigerator does not turn on after shutdown, etc.
Of course, these signs can be associated not only with breakdowns of the thermal relay, but also with malfunctions of other elements.

To correctly determine the cause of the problems identified during the functioning of the domestic refrigerator, you will need to conduct a small diagnosis. You can do it yourself.
Option # 2 - diagnostics using a thermometer
To do this, completely disconnect the refrigerator from the power supply, and then carry out its full defrosting in accordance with the instructions. Of course, the contents will have to be removed.
After that, you need to turn on the device in the network and move the temperature control knob to a position that will allow you to get the lowest possible temperature. If the refrigerator model has a freezing mode, it is recommended to use it.

To test the operation of the thermal relay, you need to free the refrigerator from all products, place a thermometer inside the camera and check its readings after a few hours
In the refrigerator compartment, approximately in the middle, you need to put a thermometer designed to measure air temperature. It is better to use a device that allows you to take measurements below zero. The refrigerator is left in this mode for about two hours. After that, you need to check the thermometer.
If the temperature in the refrigerator has dropped to about six degrees by this time, there are no problems with the thermostat. But when the inside has become noticeably warmer or colder than this level, the thermal relay will have to be replaced.
Option # 3 - visual inspection of the refrigerator compartment
If, after defrosting, a so-called snow cap forms very quickly inside the chamber, the initial diagnosis of the health of the thermostat can be performed very simply.

The appearance of a snow coat in the refrigerator almost always means that the thermostat is not working properly, it is necessary to diagnose its condition
To do this, at the time of compressor operation, the adjustment knob begins to be turned in the direction of increasing temperature inside the chamber. If the relay is working properly, at some point the sensors will record the desired temperature level, after which the compressor will shut off. If the engine continues to work, the temperature controller must be changed.
After such a diagnosis and with a good thermal relay, it is recommended to remove all contents from the camera and let the device idle for about six hours. During this period, you need to pay attention to the duration of the breaks in the compressor.
If it is about 40 minutes, everything is fine, you can use the refrigerator in normal mode. If the compressor starts up too often or rarely, try to adjust this moment using the relay settings. If this fails, you will most likely have to install a new thermostat.
Thermal Relay Dismantling Rules
If the refrigerator does not turn on at all, it will be impossible to carry out the diagnostics described above. A possible cause of the breakdown is the failure of the electrics of this element.
But a compressor malfunction may also become a problem, for example, a burned motor winding. To understand whether the thermal relay needs to be replaced, it will have to be removed from the refrigerator for research.

Typically, the thermostat is located next to the adjustment knob with which the air temperature in the refrigerator is set. Two-chamber models are equipped with a set of two such handles
First you need to disconnect the refrigerator from the network. Now you should find the place where it is located, as described earlier. Usually you need to remove the adjustment knob, remove the fasteners and remove the protective elements.
Then you need to carefully inspect the device, paying close attention to the wires through which the power supply is connected.
All of them have different color markings depending on the purpose. Usually, a yellow wire with a green strip is taken for grounding. This cable should be left alone, but all the others should be disconnected and closed with each other.
Now the refrigerator is plugged in again. If the device still does not turn on, the thermostat is probably working, but there are serious problems with the compressor.

If the refrigerator does not turn on at all, the cause may be not only a malfunction of the thermal relay, but also a compressor breakdown, for example, a blown motor winding
If the engine is running, you can make a definite conclusion that the relay needs to be replaced. Before starting work, it will not hurt to arm yourself with a smartphone or camera to sequentially record all operations. When installing a new thermal relay, these images can be very useful, especially for beginners.
It is necessary to clearly remember which core of the cable was used for what purpose. Typically, a black, orange, or red wire is used to connect the thermal relay to an electric motor. The brown core leads to zero, the yellow-green wire provides grounding, and pure yellow, white or green is connected to the light indicator.

To connect the thermal relay, wires with different color coding are used, you need to remember the purpose of each wire so as not to mix up during reassembly
Sometimes it is not easy to remove a damaged regulator, especially when placed externally. For example, in some models of Atlant refrigerators it is necessary to completely remove the chamber door from the hinges. To do this, remove the overlay that is installed above the upper hinge and unscrew the bolts hidden beneath it.
Before you remove the adjustment knob, you also have to remove the plugs and unscrew the fasteners. All these operations must be done carefully. Fasteners and linings should be stored in a small container so that they are not lost. Actually the thermostat is usually screwed to the bracket, it must be carefully removed, unfastened and removed.

If the thermostat is located inside the refrigerator, it is usually hidden under a plastic casing, where a lamp for lighting can also be mounted
A new thermostat is installed in its place, adhering to the reverse assembly order. Sometimes the failure of the thermostat is associated with a malfunction of the so-called capillary tube or bellows. If you replace only this element, the relay can be left.
To perform this procedure, you will have to remove the thermal relay, adhering to the method described above. The bellows must be disconnected from the evaporator and carefully removed from the device. Now they install a new capillary tube, attach it to the evaporator, and the relays are mounted in the same place, and disconnected wires are connected.
Replacement on the example of the Stinol refrigerator
For Stinol refrigerators, a breakdown of the relay is a fairly common occurrence, especially after five to seven years of operation.
Most often, a bellows tube breaks down here, since this is the option laid down by the manufacturer of this element. The Stinol-101 model has only one compressor, but in the Stinol-103 there are two of them: separately for the refrigerator and freezer.

This contact diagram is of the K-59 type thermal relay, which allows you to get an idea of exactly which wires should be connected to where. Color marking may differ, photos on the phone will help to save information, a similar scheme can also be drawn independently
The automation of different models is slightly different, which is reflected in the corresponding electrical circuits, otherwise these refrigerators are very similar, so it makes sense to consider the procedure for their repair at the same time.
To understand that a Stinol refrigerator needs to be repaired or replaced by a thermal relay, you need to pay attention to the following symptoms:
- the compressor runs non-stop and does not respond when the regulator is set to OFF;
- when translating the adjustment knob but the OFF mark there is no characteristic click;
- the temperature in the refrigerator chambers significantly exceeds the parameters set during adjustment.
In the Stinol-103 refrigerator, the K-59 thermal relay is used, it is not difficult to check the marking, it is indicated on the case. To remove the adjustment knobs, you need to use a thin awl. They just need to pry and remove. The Stinol-101 has only one adjustment knob, and the Stinol-103 has two, one for each compressor.

To remove the adjustment handle of the Stinol refrigerator (1), you must use some sharp object, such as an awl. Then remove the decorative pad (2), which is held by four protrusions
After the handle is removed, you need to remove the decorative trim with six tabs. This is a fragile element, you should be careful not to damage it. Under the cover there are nuts that must be unscrewed. After that, you need to unscrew the screws that secure the control panel.

Under the decorative cover there are mounting screws (1) that hold the thermal relay in the correct position, they must be unscrewed to continue dismantling the element
The screws that hold the hinge of the refrigerator door are best removed last. To avoid possible damage, the door must be held. Now you can lift the panel and remove the door from the hinges.
The next step is to remove the top cover of the refrigerator.

Fasteners that secure the control panel and door hinge (1) of the Stinol refrigerator need to be unscrewed, moving towards the door, and not from it
The necessary fasteners are located on the rear side. They are unscrewed and the cover removed. Thus, free access to the thermostat will be obtained.
First you need to disconnect the relay contact connectors, after which you can remove the element from the control panel of the refrigerator.

After removing the doors and the top panel of the Stinol refrigerator, you can carefully remove the thermal relay for inspection and diagnosis
At this stage, you need to remember or record the color coding of individual wires. To remove a worn capillary tube, remove the plastic overlay.
Now you need to unscrew the fixing screw and remove the lighting unit. The tube is removed through the hole provided for this.

To continue replacing the thermostat in the Stinol refrigerator, remove the cover (1) in the refrigerator and remove the capillary tube (2)
The new element is installed in such a way that the uninsulated portion in its lower part is securely hidden under the pad. The hole is closed with a plastic plug to restore the tightness of the chamber.
Typically, the capillary tube extends beyond the thermostat. It must be carefully placed under the top cover of the refrigerator, there is enough space there.

To remove the capillary tube (2) and replace it, first you need to disconnect the lighting unit, which is secured by a screw recessed in its housing
Now you need to reassemble the thermal relay and the refrigerator: connect all the necessary connections, install and fasten the lid of the refrigerator, hang the door.
And again, the fastening of the door hinge fasteners is performed last when the other similar screws are already installed.

The hole that forms on the rear panel during repair work should be sealed with plastic to restore the tightness of the refrigerator compartment.
To check the condition of the thermal relay of the Stinol refrigerator at home, you can use simple diagnostics. Contacts 3 and 4 of such a device should remain closed at room temperature.
If the compressor is turned on after connecting them with a jumper, the thermal relay is malfunctioning and requires replacement. If the thermostat settings are lost, they can be adjusted by turning the adjusting screws, but this should be done at a service center that has the necessary equipment.
An equally important functional unit in the design of the refrigerator is the starting relay, with the device, purpose and repair methods of which will be introduced by the article recommended by us.
The process of replacing a thermal relay is clearly demonstrated in the following video, in which the master shares the nuances of repairing refrigeration equipment such as Stinol:
The procedure for replacing the thermostat cannot be called too complicated. However, improper handling of this element can only worsen the situation. A detailed study of the repair procedure and attention to detail will help restore the refrigerator.
Tell us about how you selected a thermostat to restore the refrigerator. Share useful information and valuable information on the topic of the article, which can be useful to visitors to the site. Please leave comments, post photos and ask questions in the block below.