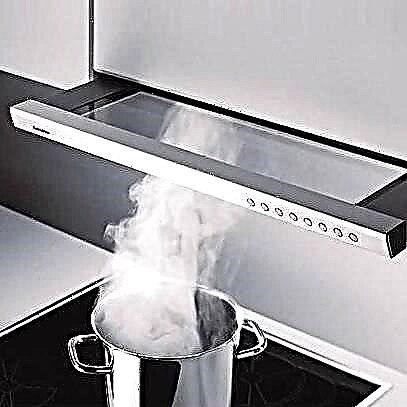
In order to protect the apartment as much as possible from winter cold and wind, as well as create an additional residential area, they carry out measures to insulate the balcony. Do it yourself or attract finishers. The first solution allows you to save money, the second - quickly get a professionally equipped turnkey balcony.
We will tell you how to conduct insulation of the balcony with your own hands so that you spend a minimum of money and achieve a high-quality result. The article describes the technology of thermal insulation and finishing. Information provided by experienced builders and home improvement enthusiasts.
Turn a cold balcony into a warm one
Any construction work on thermal insulation of the premises is preceded by planning, which includes the selection of the basic concept of the conversion, the degree of insulation, the most suitable materials, the procedure.
Organizations that offer services for insulating and decorating the balcony from the inside usually have several options in stock: from Standard, which fully protects but does not make the living space, to Lux or Premiere, after which you can arrange a workshop on the balcony, game room or lounge.

If the supporting structures and footage allow, on additional territory you can realize any plans and dreams for the realization of which there was not enough room in the apartment. Example - a corner for children's creativity
Thanks to planning, you can calculate costs and make an estimate that would suit the homeowners themselves. In addition to insulation and finishing materials, it is necessary to take into account the presence or absence of double-glazed windows. If they are still not installed, then thermal insulation should begin with the installation of window frames.
Overview of materials for thermal insulation
The market of heaters annually replenishes with new types of high-quality products with low thermal conductivity, but new options are more advanced modifications of traditional materials for thermal insulation.

Technoplex is the best development of the TechnoNIKOL company. This has already become a popular extruded polystyrene foam of general purpose, improved by the inclusion of technological additives and a steam generator
There are universal heaters that are equally well suited for facing the floor, ceiling and walls (extruded polystyrene boards, for example, Penoplex), and there are materials suitable only for finishing any one zone of the balcony. Suppose, expanded clay is covered with flooring, and for walls and ceilings it is not used due to flowability.
Overview of modern heaters, affordable and safe:
Image Gallery
Photo from
Minerals also include thermal insulation produced from slag, and products created from natural volcanic rocks. The most popular type is basalt. It is ideal for decorating balconies, as it has a minimum degree of shrinkage and hygroscopicity, practically does not burn. Cons - “steals” precious centimeters of area and requires additional vapor barrier
Ecowool has such a name, as it is made from waste cardboard and paper production, but flame retardants and boric acid are added to it. It is safe for humans, has a "breathing" structure, high noise insulation and low thermal conductivity, refers to moderately combustible materials. Can be stacked in bulk, using an aqueous or adhesive solution.
It is made on the basis of silicon or zirconium, therefore it is highly resistant to heat. The vapor permeability is even lower than that of mineral wool. Fireproof, resistant to the development of microflora, the appearance of rodents is also excluded. The advantage is minimal deformation due to mechanical stress.
Any of these materials is made from petroleum products, with approximately 98% of the air distributed in the cells. Polyfoam is not afraid of humidity, it is resistant to microflora. Thermal conductivity is lower than that of mineral wool. It has zero vapor permeability, so additional vapor barrier is not needed
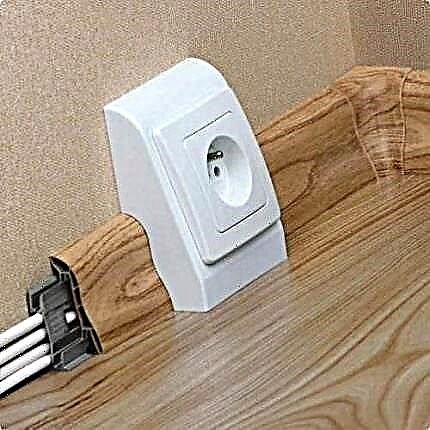
This is a relatively thin material with a reflective layer, which, depending on the type, can be mounted when laying a warm floor, as well as to protect walls and ceilings. The thickness of the sheets is 0.3-1.0 mm, which is valuable for finishing narrow balconies. Type “C” is used for wall insulation on an adhesive basis, which facilitates installation
The volume of sheets arises due to the addition of a foaming component to ordinary polyethylene. The material has excellent vapor barrier properties, therefore it is often used as an addition to glass wool. Advantages: resistance to mold and mildew in high humidity, sound absorption
This is a relatively heavy material consisting of chips bound with synthetic resins and flame retardants. Not used alone. Suitable as an economical option for leveling surfaces or creating a coating over a layer of mineral wool. Requires additional waterproofing, as it has the ability to quickly absorb moisture
Insulation applied with spray guns is rarely used in everyday life, mainly by professional builders. Rigid polyurethane foams are not inferior in thermal conductivity to mineral wool. The advantage of the sprayed insulation is that it can be used for thermal insulation of complex configurations
Mineral wool - a balance of value and quality
Ecowool - safety and low weight
Ceramic wool - a type of mineral wool
Expanded polystyrene (extruded polystyrene foam, polystyrene)
Penofol - space saving
The made foam polyethylene - a barrier for steam
Particle Boards - Particleboard
Polyurethane foam - spray thermal insulation
To decide what is better and faster to warm the balcony, you need to analyze the installation conditions. Suppose it is better to use thin materials - penofol, polyethylene - on balconies with a space deficit.
If the area allows or you need to raise the floor to the height of the flooring in the room, then any thick insulation in the crate is suitable - mineral wool, glass wool, polystyrene.
Step-by-step instructions for warming the balcony
There are many options for thermal insulation, since the level of initial insulation is different. Elite homes often for rent with balconies equipped with triple glazing and underfloor heating. Budget housing is a minimum of arrangement.
In order to make a comfortable room out of a standard balcony in a "panel" or "stalin" built in the last century, it is necessary to completely sew up all surfaces except glazed, heat and waterproofing. Consider the solutions available to homeowners.
Stage 1 - arrangement of the parapet and floor
If the concrete base is partially destroyed, then it is necessary to make a cement screed - without a solid and solid foundation, the insulation measures are useless.
Filling is done in the traditional way:
- Determination of the "zero point" fill.
- Lapping waterproofing - films, membranes, roofing material.
- For old balconies - reinforcement with metal or plastic mesh.
- Setting lighthouses.
- Fill and align from the far corner.
Attention! Screed maturation takes at least 28 days - this must be taken into account when planning further insulation work.

Alignment of the not yet hardened cement layer is carried out simultaneously with pouring, and not at the end. If there is no special tool at hand - the rules, you can use the board
A smooth and even floor is one of the conditions for installing thermal insulation and, if necessary, the “warm floor” system.
Photo instruction on floor insulation on logs and leveling with chipboard plates:
Image Gallery
Photo from
It is enough to clean the finished base with a construction vacuum cleaner or manually, using an ordinary broom and dustpan. But if there are hollows, crevices, gaps in the joint area, it is recommended to fill them with cement mortar or mask with foam
For the floor to be warm, a heat insulation layer of 7-16 cm is required. It is important to consider the threshold height - up to 20 cm, the total height of the loggia - up to 2 m 45 cm, the height of the fence not lower than 95 cm, not higher than 110 cm. The corner of the step is closed with a corner, and the joint of the floor and the wall with the baseboard, it is important that they do not touch
Transverse logs are made from a beam of 50 * 70 mm, which serve as the basis of the draft floor. The length of each part is equal to the width of the balcony or loggia. For fast cutting, they usually use an electric saw or a jigsaw, but an ordinary hacksaw will do.
Cross logs are laid out on the length of the balcony so that the distance between them is 40-60 cm. Anchors 112 mm are suitable as fasteners, but for old houses with thin slabs they are too large. Before installation, pre-drill holes in the bars with a drill
Long logs should be laid on top of the cross so that the interval between them is not more than 45 cm. Given the width of typical balconies, usually 3 pieces are enough. The distance from the extreme log to the wall adjacent to the room is 10 cm, to the parapet - 20 cm. Fastening is done with screws
First, the first layer of mineral wool is laid between the crossbeams so that it densely, without gaps, fills the entire space under the bars. Then the remaining insulation is distributed between the longitudinal bars. On 1 balcony 1 packing of rolled mineral wool leaves
Large plates are cut into pieces along the width of the balcony, laid on the upper rails and screwed to them with 41 mm screws. In order not to miss the bar, on the wall opposite each bar, you can make notches with a marker or pencil
After laying the sheets of chipboard, it is necessary to ensure tightness and close the contour of the subfloor using mounting foam. If this is not done, the smallest particles of cotton wool during air exchange will fall first under the wall cladding, and then into the room air
Step 1 - preparing the foundation
Step 2 - marking the room
Step 3 - cutting wooden logs
Step 4 - securing the transverse parts
Step 5 - installation of longitudinal elements
Step 6 - laying two layers of mineral wool
Step 8 - filling the circuit with foam
Chipboard slabs were chosen for good reason. Unlike wooden boards and plywood, after a while they do not begin to creak and deform. At high humidity, they expand only slightly, but then return to their original borders.
So that when expanding the sheets do not rub against each other and do not make strange sounds, 1-2 mm gaps are left between them, which absolutely do not affect the quality of installation of the floor covering. For proper insulation of the balcony floor, all the details are important - from the thickness of the materials to the choice of fasteners.
The installation of a floor heating system will help to achieve the highest possible result in turning a balcony into a living area, with the device of which the article recommended by us will familiarize you.
Stage 2 - the process of wall insulation
If the dimensions of the balcony allow, then one of the best options for thermal insulation of walls is Rocklite stone wool produced by the TechnoNICOL company. But you can use products that are suitable for the characteristics of other manufacturers.
A double layer will create the most warm “pillow” for all walls - installed together with double-glazed windows, side walls and adjacent to the room.
A thick layer of insulation is also an excellent sound insulation, which is necessary to create a cozy, residential atmosphere on the balcony. Thin materials are not able to create a protective barrier against street noise as good as mineral wool
Work execution order:
Image Gallery
Photo from
The frame is a crate around the entire perimeter of the balcony. For its creation, a bar with a size of 50 * 50 mm is suitable. The step between adjacent bars is 580-590 mm. Fasteners - self-tapping screws
The bars of the crate can be placed along and across. Under the glazed part, it is better to install the crossbars perpendicular to the floor, and on the side and "warm" walls - in parallel
When installing the crate, it is necessary to take into account the dimensions of the thermal insulation so that you do not have to cut each piece or use additional fasteners
If it is necessary to install small fragments in the corners or under the ceiling, the insulation plate is cut. To do this, use a construction knife, the size of each piece is 1-2 cm wider than the cell frame
Rocklight non-combustible heat-insulating plates are easily mounted between the bars without additional fastening, if the recommended distances between the crossbars are observed
For complete insulation, it is necessary to mount two layers, so on top of the first again wooden blocks are fixed - perpendicular to the already installed crossbars. Then lay Rocklight
Roll-up vapor barrier is rolled out, cut to length, individual pieces are fixed with a construction stapler to wooden parts. Joints are glued with double-sided self-adhesive
The upper rails are thinner than the details of the lathing. The counter-beam serves as the basis for the installation of the finish - for example, lining or plastic panels. It can be fixed both horizontally and vertically. Installation step - 400-600 mm
Step 1 - installation of the lathing under the glazed part
Step 2 - mounting the bars on the remaining walls
Step 3 - marking according to the width of the plates
Step 4 - cutting insulation into fragments
Step 5 - fastening the plates between the crossbars
Step 6 - Reinstall the Thermal Insulation
Step 7 - fixing the vapor barrier
Step 8 - securing the counter beam
The width of the insulating layer is 100 mm (2 layers of mineral wool of 50 mm each). This should be taken into account when planning the finishing of walls, especially if it also "takes away" a few cm of free space. You have to choose one thing - either high-quality insulation and silence, or a more spacious room, but coolness and noise.
You should not save on vapor barrier - it protects the insulation from moisture, thereby preserving its properties. High humidity is not immediate, but over time can degrade the performance of even expensive and high-quality thermal insulation.
Stage 3 - thermal insulation of the ceiling
It is not worth ignoring the ceiling insulation, since there is no guarantee that the neighbors from above also took care of the balcony insulation. Efficiency can be achieved in only one way - by protecting the balcony as much as possible from all sides.

Unlike the floor, the ceiling does not require the creation of multi-layer pies. Usually, a lightweight material with low thermal conductivity is chosen for installation, which can be installed both on the crate, and on glue or special dowels
Most often, smooth plastic panels or an easy-to-mount wooden lining are used as the finish. The installation method of both types of cladding allows you to fix any material on the ceiling: extruded polystyrene foam, and thick mineral wool, and thin foil foamed foam.
Some good solutions:
Image Gallery
Photo from
Installation of Penoplex on glue or dowels
Laying mineral wool above the lining
Installation of mineral wool over a drywall construction
Finishing the ceiling with penofol for the crate
Thermal insulation of the ceiling is usually carried out along with wall insulation. Each method is different nuances.For example, when using mineral wool, glass wool and ecowool, it is strongly recommended that a vapor barrier be installed on top of the insulation layer. To fix the polystyrene foam plates, even if it is glued, glue plugs are used - “fungi” - 4 pieces for each plate.
Finishing Interior
Not always decorative or finishing is just a finishing coating or decoration of the interior. Some materials also perform the function of insulation.
The difference is easy to understand if you compare two materials for wall decoration: acrylic paint and cork panels. The first simply changes the color of the wall covering and, possibly, protects it from moisture, corrosion, mold. Cork is a good heat and noise insulation.
Consider the most popular options for a balcony, which perfectly hide the insulation and themselves, albeit partially, isolate the room from the cold.
Image Gallery
Photo from
Wall paneling is lined with walls and ceiling, while a more durable board goes to the finish of the floor. The advantages of the material are environmental friendliness, aesthetics, ease of installation, low cost (does not apply to expensive breeds). Before installation, it requires treatment with flame retardants and other protective agents - paint, varnish
The material for the manufacture of cladding is polyvinyl chloride. He does not “breathe” like a tree, but is more practical and lightweight. The installation of plastic rails is the same as the installation of the lining. When fastening parts, it is not recommended to use nails. The advantage of plastic is the variety of designs and sizes
Material made on the basis of gypsum is chosen if it is planned to paint or paste the walls. It is even, does not need additional plaster or putty. However, a primer is necessary before wallpapering, otherwise during the next repair the wallpaper will be removed along with part of the drywall
There are many options for artificial and natural stone, which can be faced with a balcony. But it must be borne in mind that neither a clinker, nor tile, nor even gypsum elements can be held by a weak wall, therefore installation should only be carried out on a reliable support. Sometimes they wall one wall - adjacent to the apartment, but this is enough to ennoble the interior
Wooden lining and boards
Plastic lining or panels
Drywall Sheets
Decorative stone or tile
In addition to the listed facing materials, cork panels are used that are easily and simply mounted on acrylic adhesive.
A laminate is suitable for the floor, also creating a thin but insulating layer. And ceramic tile, on the contrary, cools the surface, if it is not heated from below by an electric cable of “warm floor”.
The following article, which we highly recommend reading, will familiarize you with the features of the thermal insulation of the loggia.
Video # 1. The procedure for laying stone wool:
Video # 2. Penoplex + Penofol - thermal insulation of the entire balcony:
Video # 3. Ceiling insulation tips:
Competent advice on how to properly and without errors insulate a balcony can be obtained from manufacturers of thermal insulation materials. In addition to advertising information about products, they publish detailed installation instructions for the insulation, the implementation of which guarantees high work efficiency.
Thanks to the description of technical characteristics, which can also be found on the official websites of enterprises, it is possible to choose the most suitable materials.
Want to talk about how to equip and insulate a balcony with your own hands? Does your technological “arsenal” have methods that can optimize the process of thermal insulation and the result of work? Please write comments in the block below, post photos, ask questions about the topic of the article.