Thermal insulation of facades, ceiling and floor helps to significantly reduce the cost of heating the building, saving is 25 ... 40%. But the capital warming of the house outside is not an expensive procedure. Lack of funds can be compensated by one’s own labor - to purchase the necessary materials and perform thermal insulation work independently. How to properly insulate the walls outside, we will tell in this instruction.
Wet facade insulation
This option of thermal insulation is applicable to all types of stone walls - brick, concrete, aerated concrete. It is also used for external insulation of apartments in multi-storey residential buildings. For walls made of timber and logs, this method is not suitable; wooden houses should be insulated using the “ventilated facade” technology.
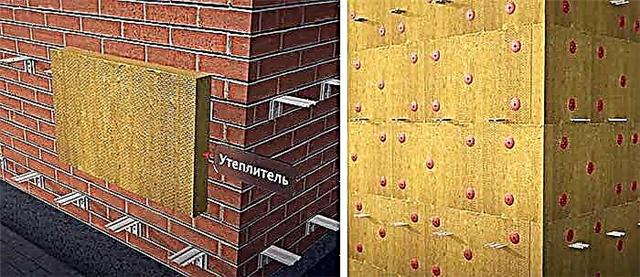
The essence of the method: thermal insulation material is attached to the wall surface with a building adhesive mixture, then fixed with dowels. From above, the insulation is covered with a protective waterproofing layer of the same glue, it is plastered and painted. That is, all insulation work is accompanied by “wet” processes.
External insulation of the walls of a private house in a "wet" way is carried out in 4 stages:
- Calculation of the quantity of materials, purchase
- Preparatory work.
- Installation of a heat-insulating layer.
- Application of waterproofing, decorative plaster, paint.
The insulation is foam plastic with a density of 25 kg / m³ or mineral wool made from basalt fiber (over 100 kg / m³), less often - extruded polystyrene foam. The mineral wool base is not suitable for thermal insulation; only polystyrene polymers that do not absorb moisture are used.

Clarification. For external insulation with subsequent plastering, plate heaters are used. The cheaper rolled glass wool used on roofs, ceilings and attics is not suitable. The better to insulate a country house, read our other publication.
Calculation of material consumption
To find out the amount of insulation, building mixtures and other related building materials, we will use the long-developed technological map “Ceresit Bonded External Thermal Insulation System”. This document clearly prescribes the technology of insulation, determines the consumption of insulation materials and fasteners per 100 m² of surface.
To calculate, you need to measure 3 parameters:
- the external surface area of the insulated walls in square meters;
- area of window and door slopes;
- linear meter of all corners of the building - external and internal, the corners of window openings are also considered.
Reminder. Do not forget to measure the length and area of the lower window slope hiding under low tide. Existing ebbs will still have to be changed - after installing the insulation, they will turn out to be too short.

According to the technological map from the Ceresit company, such a quantity of materials will be used for insulation and exterior decoration of a building:
- PSB-S polystyrene or mineral wool - 108 m² for every 100 squares of the wall;
- to warm 100 m² of slopes, 117 m² of polystyrene or mineral wool will be needed;
- primer for surface preparation - 20 l / 100 sq. m .;
- adhesive mixture for the installation of foam / mineral wool boards - 600 kg / 100 m² of all surfaces;
- another 140 kg of glue will be used to strengthen 100 m. corners;
- waterproofing adhesive layer with a thickness of 3 mm - 600 kg of the mixture, 5 mm - 750 kg / 100 m²;
- fiberglass with a cell size of 5 x 5 mm, resistant to alkali, - 130 m² (consumption is the same for walls and slopes);
- metal basement profile - 102 m for every 100 meters of the foundation length;
- perforated corners with fiberglass - 105 m / 100 m. of all corners of the house;
- plate-shaped dowels for mechanical fastening of foam plastic - 500 pcs., mineral wool - 800 pcs. / 100 m².
The thickness of the waterproofing depends on the choice of the finish of the “pie”. An inexpensive way is to apply a thicker layer of glue 5 mm, then paint. The second option is to apply 3 mm of the adhesive mixture, and on top - decorative plaster of the “bark beetle”, “shagreen” type and the like. Plaster mixes can be immediately tinted or painted after drying.
We do not indicate the consumption of paints and plasters, since it strongly depends on the type of material. Before plastering, it is advisable to prime the waterproofing layer with a special compound, for example, Ceresit CT15 / CT16.

Preparatory stage
In order to successfully warm the house from the outside using “wet” technology, it is necessary to wait for favorable weather conditions. The outdoor temperature is within 5 ... 30 ° C of heat, no precipitation. If it starts to rain during the warming process, work is suspended until the surfaces completely dry.
Preparation of the base includes the following operations:
- Dismantling window tides and other decorative elements that interfere with the conduct of thermal insulation works. Wooden details of roofing overhangs are preferably painted.
- Removing old plaster from window and door slopes. The plaster layer is also removed from the insulated wall if it does not adhere well or is covered with cracks.
- Protrusions, crevices, and valleys larger than 10 mm must be removed. The former are confused, the latter are sealed with a cement-sand mortar. The protruding layout on a brick wall is better to be chipped.
- The wet surface should be dried in the sun or use a heat gun.
- Dust removal with a brush or compressed air from the compressor.
- Application of a deeply penetrating primer with a roller or spray gun (including on slopes).
Tip. Take care in advance of the means of conducting high-altitude work - stairs, step-ladders, scaffolding (if we are talking about the second floor). Another recommendation: be sure to cut tree branches located too close to the cottage. Later they will grow and under the influence of wind they can open the entire facade, catching on the fiberglass mesh.
Since external insulation begins from the bottom, base profiles are installed along the upper edge of the foundation. They serve as a backup to the first insulation boards and align them horizontally. If the house has an unheated basement, the profiles are attached 30–40 cm below the ceiling.
Installation of a heat-insulating layer
The wall structure is insulated from the bottom up, the first row of plates is supported by a basement profile. Kneading is done according to the manufacturer’s instructions (on the bag), the mixture must be worked out within 1.5 hours.

The technology of foam insulation looks like this:
- We apply the adhesive solution to the plate using 1 of 3 methods (presented above in the diagram). From the moment of application to gluing to the surface no more than 20 minutes should pass.
- We insert the first plate into the profile and fasten it to the wall at the corner of the building, gently squeezing it over the entire plane. The goal is to squeeze out air jams as much as possible. We remove excess glue on the sides, check the vertical and horizontal levels.
- The next plate is applied to the wall at a distance of 1.5–2 cm from the first, then we slide it close to it. We press the insulation so that the outer surfaces of the plates are in 1 plane, without differences. The permissible joint width between them is 2 mm.
- We cut the last plate in the row along the corner of the house + departure to the thickness of the insulation of the adjacent wall to provide a gear dressing. The second row is glued in the opposite direction with an offset relative to the first, starting from the corner.
- If the insulation does not adhere well, we tear it off, remove the solution from both surfaces. Then we apply glue again, we establish a plate in place.
- If the width of the seam is exceeded 2 mm, fill the slot with scraps of foam. It is impossible to lubricate joints with glue mixture.
- Slopes of windows and doors are pasted with 20 mm thick foam, joints are filled with sealant, as shown in the drawing.

Recommendation. Homeowners with no experience in facade work should first work out. Prepare half a bucket of glue, try to apply it correctly on the foam and attach it to the wall.
Too wide gaps or voids may be blown with polyurethane foam. Considering the expansion of the mounting foam, fill the gaps after the glue dries (at least 2 days).
To apply the solution to the stove insulation, 3 schemes are used:
- if the wall irregularities do not exceed 10 mm, the adhesive is applied in strips with an indent of 20 mm around the perimeter;
- for differences of 10–15 mm, the beacon method is used - strips around the perimeter of the slab 6 cm wide, inside - beacons Ø100 mm and 2 cm high;
- for bonding mineral wool and with irregularities up to 5 mm, the mixture is applied continuously, leveled with a notched trowel.
After 3 days, when the glue finally hardens, you need to perform 2 more operations:
- Eliminate differences at the joints between the foam plates. We take a wooden grater for plastering, wrap it with rough sandpaper and grind the protruding edges of the insulation.
- Additionally, fix the insulation with special dowel umbrellas.

Attachment points are determined according to this scheme: 4 dowels are placed in the corners of each plate directly into the seams, 2 more in the middle. In the marginal areas near the corners of the cottage are placed additional umbrellas, as shown in the drawing. The depth of the holes (and the length of the dowels) for concrete is 5 cm, for hollow bricks - 9 cm, for aerated concrete - 11 cm.
Waterproofing and Finishing
The protective waterproofing layer reinforced with fiberglass is applied with the same adhesive mixture. First of all, it is necessary to strengthen the most vulnerable places of the insulation system, following this instruction:
- Using a drill with a stirrer, prepare 1 bucket of adhesive.
- Glue perforated corners with fiberglass to all external corners of the building, window and doorways.
- To avoid the appearance of oblique cracks in the corners of the openings, stick on the walls of the canvas fiberglass mesh size 350 x 200 mm, as shown in the diagram.

When the solution on the strengthening elements hardens, you can proceed to the device of continuous waterproofing. Prepare the right amount of glue mixture and proceed to work in the following order:
- Cut the fiberglass cloth, the length should be equal to the height of the insulated wall plus 10 cm. First, prepare 1 cloth.
- Using a metal grater, evenly apply a 2 mm thick adhesive layer to the insulation. Apply the solution from top to bottom, with a vertical strip 1100 mm wide.
- Dip the cut strip of the fiberglass mesh into the adhesive layer to a depth of 1 mm. After making sure that the length of the first canvas is enough, you can further cut similar canvases.
- Apply the next strip of mortar and glue the second mesh sheet. Observe an overlap of 10 cm on an adjacent strip of fiberglass mesh.
- After mounting the reinforcing layer, apply a 2 mm thick solution on top. If it is not planned to plaster the “pie” of insulation, apply a thicker layer of glue - at least 3 mm.
- Form and correct the corners, after preliminary drying, eliminate minor defects.
Tip. At a height of 2 m from the ground, it is better to glue the second layer of the mesh, which protects the waterproofing from mechanical damage.
If you do external insulation with your own hands and do not have experience in plastering, we recommend that you implement a simpler and cheaper option - make waterproofing 5 mm thick, then simply paint the wall with acrylic or silicone paint. The second option is to apply a thin layer of 3 mm glue and hire plasters to apply a decorative finish, such as a bark beetle.
Video: insulation instructions
Thermal insulation according to the technology “Ventilated facade”
This method of external insulation is universal and suitable for all types of reinforced concrete, stone and wooden houses.Exception - frame buildings and cottages from SIP panels, in which the insulation is laid inside the wall.
We list the differences between a ventilated curtain wall facade and “wet” insulation:
- the absence of wet processes, the insulating layer is attached to the insulated surface only with plate-shaped dowels;
- waterproofing (it is also wind protection) is provided by a special membrane that allows moisture to pass in 1 direction - from the inside out;
- between the external finish and the insulation there is an air gap 50-100 mm wide;
- the facade cladding is mounted on a subsystem - a metal or wooden frame;
- You can choose a suitable facing material - siding (metal or vinyl), aluminum composite panels, corrugated board, porcelain tiles, various artificial stone.

An important point. The insulation is made of porous materials that pass water vapor well — mineral wool based on basalt or fiberglass. Density - from 80 kg / m³. Polyfoam or polyfoam is not applied.
Warming “ventfasad” works like this: in winter, water vapor striving to leave the room passes through the wall, the thickness of the mineral wool and the waterproofing membrane. Getting into the ventilation gap between the outer casing and the heater, the steam is carried away by air currents.
As a rule, the price of materials for ventilated systems is higher than building materials for a “wet” facade. We propose to consider the cheapest option of insulation - mineral wool + vinyl siding.
Procurement of materials
The calculation of components is based on a document developed by the well-known manufacturer of fibrous insulation - the company URSA. So, on 1 m² of insulated surface you will need:
- non-combustible basalt (or glass wool) insulation in slabs - 1.05 m²;
- siding panels - 1.15 m²;
- Docking strip - 0.22 pcs.;
- galvanized metal profile T-shaped - 0.22 linear meters;
- the same, L-shaped - 0.84 m .;
- wall bracket - 1.12 pcs.;
- paronite gaskets - 1.12 pcs .;
- wind-diffusion diffusion membrane - 1.2 m²;
- driven dowel - 1.12 pcs .;
- dish-shaped anchor in the form of an umbrella - 7 pcs .;
- self-tapping screw - 16 pcs.
Note. There are no additional elements in the list - low tides, decorative corners, slope cladding panels. Their number depends on the architecture of the house and is considered individually.
The list is compiled for a finished subsystem made of galvanized steel. For the installation of the insulated facade sheathed with porcelain stoneware, more rigid stainless steel profiles are used. The cost of such systems is significantly higher.

In order to reduce the cost of homeowners, this option is often practiced: instead of a steel frame, wooden bars with an interval of 580 mm are directly attached to the walls, mineral wool slabs are laid opposite between them. It is also possible, but the effectiveness of thermal insulation is markedly reduced, since the tree conducts much more heat than mineral wool.
Installation of a ventilated system
Warming with the "dry" method is made easier compared to the "wet" facade. The insulation is fixed on the brackets of the frame, then attached to the wall with plate-shaped dowels, no solutions are used. An important nuance: the subsystem is mounted precisely under the cladding (siding, lining, porcelain tiles and so on), and not under the dimensions of the heat-insulating boards.
The device of the ventilated facade for plastic siding is carried out in the following order:
- We mark on the wall the attachment points of the brackets for vertical guides. We start from the corner, observing a distance of 45-50 cm between the points. The last brackets should be mounted on the opposite corner of the wall, so the specified interval can be increased or decreased by 5-10 cm.
- We install the brackets, fasten the U-shaped extension profiles to them. In order to exclude cold bridges, we place gaskets of paronite under the bracket pads.
- We lay the heat-insulating layer, making slots under the profiles in the plates of cotton wool. We fix the insulation with dowels. Installation is allowed in any convenient direction - bottom, top, side.
- The canvases of the superdiffusion membrane are stretched horizontally, starting from the bottom. Carefully put the film on the brackets with a slight tightness, previously making cuts with a knife. The next canvas is stretched with an overlap of 15 cm to the previous one, it is not necessary to glue the joint.
- We press the membrane to the thermal insulation with several plate-shaped dowels. Above and below, we leave an overlap of 10 ... 15 cm, we wind it up with a heater.
- We fix the first and last vertical bar on the wall, display them on the same plane using the level. If the wall is long, install 1-2 intermediate guides.
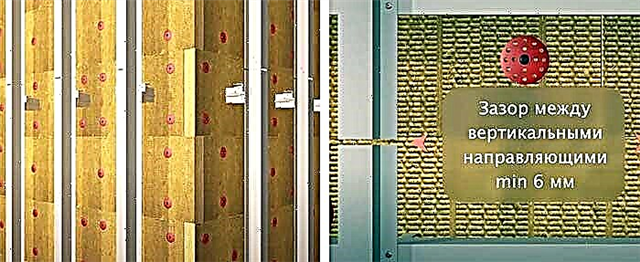
- Focusing on the first planks, we mount the remaining vertical profiles. If the racks have to be joined from 2–3 parts, we leave thermal gaps of 6–7 mm between the ends.
- Using horizontal jumpers, we form corners, window and doorways. Then we trim the facade with siding according to standard technology, which is described in great detail in the video (below).


Note. Proper installation of the waterproofing membrane with the logo facing out. In the absence of a logo, a special mark is placed on the front side of the film.
When mounting the frame, a ventilation gap of 50 ... 100 mm wide should be provided due to extension brackets. If you plan to lay siding panels vertically, then install the profiles horizontally.

We carry out thermal insulation with mineral wool according to the following rules:
- adjacent plates are mounted close to each other, the maximum clearance is 2 mm;
- vertical joints between the plates should not coincide, the top row is laid with an offset relative to the bottom;
- gear dressings are made at the corners of the building;
- At the end of the row, you cannot add narrow insulation strips - fasten the solid plate at the corner, and insert the missing piece in the middle.
Tip. Narrow strips of cotton wool is better not to insert at all, since they cannot be attached to the surface. Adjust the dimensions of the last plates so that there are no such inserts.
Conclusion
To warm stone houses outside, the “wet” method is more often used. This option is cheaper and allows you to track the shrinkage of the building. If the load-bearing wall is cracked, the defect will certainly appear on the outer layer of thermal insulation. Under the ventilated hinged facade, such problems are not visible, which is not always good. There is a third method - cladding of exterior structures with thermal panels with finished cladding. They are great for decorating apartment buildings. But in private housing construction this option of insulation is not very popular because of the price of the material and the difficulties of installation in cottages with complex architecture.